Showing posts with label feature of the week. Show all posts

Thursday, July 20, 2017

Feature of the Week: Smart bibliographies for Jekyll web pages

If you like Jekyll for rendering web pages then check out the new Jekyll plugin for BibSonomy. If you do not know Jekyll, yet, you might check out its web site and then test the plugin.

What it is

Jekyll is an easy-to-use but powerful generator for static web pages which is used to render HTML pages on GitHub and GitHub pages. It is also quite flexible, since its functionality can be extended by plugins that, for instance, create tag clouds, embed maps, or generate a sitemap.
Recently, we have released the first version of a Jekyll plugin for BibSonomy which renders bibliographies (publication lists) in Jekyll-generated web pages using data from BibSonomy. Every time the site is built, the plugin retrieves the latest posts from BibSonomy and renders them in one of the many thousand available CSL styles. Optionally, the plugin can download and link documents associated with a post and render an Altmetric badge for each publication with a DOI. For instance, my publication list is rendered using a slightly adapted Springer LNCS stylesheet with some CSS that colourises the item bullets in the list using the DBLP color coding scheme for different publication types.

How it looks


The color of the bullets indicates the publication type: conference papers are blue, journal articles are magenta. An entry with an Altmetric badge looks as follows:


How to use

Using the plugin is quite simple: just add some lines of configuration to your site’s _config.yml file and then place the bibsonomy tag into the page where you want the bibliography to be rendered.
  1. First, add the dependency to the plugin to your Gemfile:

    source "https://rubygems.org"
    
    gem 'bibsonomy-jekyll'
    

  2. The most basic configuration just enables the plugin and provides your user name and API key:

    gems:
      - bibsonomy-jekyll
    
    bibsonomy:
      user: yourusername
      apikey: yourapikey
    

    You can get your BibSonomy API key from the settings page.
  3. Options for customization in the bibsonomy section include:

    document_directory: pdf
    style: acm-sig-proceedings
    altmetric_badge_type: 4
    

    where:
    • the document_directory specifies a directory where documents attached to posts shall be downloaded from BibSonomy and linked on the page. If empty, no documents are downloaded.
    • style specifies the name of a CSL style which should be contained in the Ruby CSL library or provided as a file with the same name and the file name extension .csl.
    • altmetric_badge_type adds a HTML <span> element to each publication with a DOI that renders the Altmetric badge with the corresponding id, when the required JavaScript is included on the page.
  4. Now a bibliography can be rendered on any page by including the bibsonomy tag:

    {% bibsonomy user yourusername myown 3 %}
    

    This would render the latest three posts of the user “yourusername” which have the tag “myown”. A variable number of tags can be provided (separated by space) and instead of a user’s posts the posts of a group can be rendered by exchanging user with group followed by the corresponding group name.

That’s it. More details can be found in the plugin’s documentation.

Happy bookmarking!

Friday, August 7, 2015

Feature of the Week: Person Entities

It is vacation time and hence our features of the week are more sporadic but this week we want to give you a glimpse on current developments. 
One of the main features we are working on is the implementation of persons (i.e., authors and editors of publications as well as users) as first-class entities in BibSonomy. The goal is to improve the search and disambiguation facilities. These are crucial for person names since they frequently contain duplicates (example: http://www.bibsonomy.org/author/Li). 
This also allows us to add extended features for persons. For instance, it will be possible to define relationships between persons like the advisor-advisee relation. Ultimately, this will extend BibSonomy towards a full-fledged system to manage scientific genealogies. We hope you will like this feature and welcome any comments on it!

Thursday, June 18, 2015

Feature of the Week: New REST Client for PHP

We spent some time developing a new full-featured REST Client in PHP in order to make it much easier for you to develop new Apps for the BibSonomy universe.

The new REST client library comes with a lot of new features:


  • It's full-featured that means the client supports the whole functionality of the API.
  • It contains a model such that it is convenient for you to work with the data.
  • It supports Basic Auth as well as OAuth authentication methods.
  • It's easy to integrate in your PHP App, since we have used composer, a powerful tool in order to integrate and autoload requirements of 3rd party software.
  • You can output a fetched set of publications as a CSL-rendered publication list in your favorite citation style.

In order to use the restclient-php library you need to do three steps:

  1. Install the library via composer and include the autoloader file.

    Installing Composer locally is a matter of just running the installer in your project directory:

    curl -sS https://getcomposer.org/installer | php

    Then, add the restclient to the requirements of your project. Run the following command on a terminal within your project folder:

    php composer.phar require academicpuma/restclient-php:1.0.0-alpha
     
  2. Create an Accessor. This object is required to authenticate your App on the REST API of BibSonomy. You can choose between two authentication methods, Basic Auth or OAuth. For Basic Auth this would be:

    <?php

    require 'path/to/vendor/autoload.php';
    use AcademicPuma\RestClient\Accessor\BasicAuthAccessor;

    $accessor = new BasicAuthAccessor('http://www.bibsonomy.org', [your-username], '[your-apikey]');
    ?>
     
  3. Create a RESTClient object and perform a request. This object is your interface to BibSonomy. This class provides all supported functions to get, create, update, and delete posts, tags, documents, user and groups. For example:

    <?php

    use AcademicPuma\RestClient\RESTClient;
    use AcademicPuma\RestClient\Config;

    $restClient = new RESTClient($accessor);
    //choose Resource type and tags
    $restClient->getPosts(Config\Resourcetype::BIBTEX, Config\Grouping::USER, [username], ['tag1', 'tag2']);
    ?>


    Now, you can choose the format. There are four options: XML, CSL (JSON), Model (PHP Objects), Bibliography (CSL-rendered publication list):

    <?php
    
    
    //output xml
    echo $restClient->xml();
    
    //output CSL
    echo json_encode($restClient->csl());
    
    //use the model
    $posts = $restClient->model();
    foreach($posts as $post) {
        echo $post->getResource()->getTitle()."<br />\n";
    }
    
    //print a bibliography in your preferred style and language
    echo $restClient->bibliography('apa', 'en-US');
    
    ?>
    
Currently restclient-php is considered as unstable alpha version. If you encounter  any errors or problems, feel free to report an issue on our code repository.

Happy tagging,
Sebastian.

Wednesday, June 10, 2015

Feature of the Week: Safari Extension

We already released a Chrome extension and a Firefox plugin to replace our old Javascript based bookmarklets. Today we are pleased to announce the launch of our new Safari extension. The extension adds three new buttons to your browser:


The first button opens your personal BibSonomy home page. With the other two buttons you can post new bookmarks or new publications to BibSonomy. 

You can download the plugin from the Browser Add-ons & Bookmarklets page.

happy tagging
Daniel

Wednesday, April 29, 2015

Feature of the Week: TeXlipse Extension Update

We are happy to announce the release of our TeXlipse Extension version 0.1.1.1. For more information about the extension, please have a look at this Feature of the week or at the help page of the extension.

To update your extension please add the new update site texlipse.bibsonomy.org and use the Eclipse update mechanism to install the latest version of the extension. Please note: the update site of TeXlipse (texlipse.sourceforge.net) contains an older version of the plugin. Newer versions of the plugin will only be distributed over the new update site (texlipse.bibsonomy.org).

What's new in 0.1.1.1?
The new release allows you to configure the API endpoint. Starting with this release, all PUMA users can use the extension with the PUMA installation of their institution. The API url can be obtained by adding /api to the web address of your PUMA system (e.g. the API endpoint of http://puma.uni-kassel.de is http://puma.uni-kassel.de/api). Furthermore, we have fixed some bugs.

Happy texing and tagging
Daniel

Wednesday, April 22, 2015

Feature of the Week: BibSonomy Plugin for Google Docs


During a project in Web Technologies at the Leibniz University of Hannover we developed a plugin for Google Docs, which connects to BibSonomy to access the user's bookmarked publications and helps inserting them with a single press of a button:


We added a search mechanism to provide a simple way of searching for specific documents in bigger collections. The plugin has an easy-to-use user interface, which is embedded as a sidebar in the Google Docs interface. The login into BibSonomy uses the username and the API-Key of the BibSonomy account to access the bookmarks. After the first login your information is saved into the document, so you have to provide your user information only once.

You can read more about the plugin and get the source code on Bitbucket or you can try it yourself in this example Google Doc.

Happy writing!

Linh Phan and Florian König

Thursday, April 2, 2015

Feature of the Week: BibSonomy for Ruby!

Recently, we have published a BibSonomy client for Ruby that enables easy retrieval of posts with the popular programming language Ruby. The code is published on GitHub but also available as a Gem such that you can install it with a simple gem install bibsonomy. Using the client is as convenient as with the BibSonomy clients for other languages: just instantiate it with your user name and API key and then query BibSonomy:

require 'bibsonomy'
api = BibSonomy::API.new('yourusername', 'yourapikey', 'ruby')
posts = api.get_posts_for_user('jaeschke', 'publication', ['myown'], 0, 20)

This requests the first 20 publications of the user "jaeschke" that have the tag "myown". They are returned as ruby objects within a list.

We have also integrated the CSL rendering language such that with the following lines you can easily render posts in any of the thousands of style sheets available for CSL:

require 'bibsonomy/csl'
csl = BibSonomy::CSL.new('yourusername', 'yourapikey')
html = csl.render('jaeschke', ['myown'], 100)
print html

Feel free to contribute to the client by forking it.

Last but not least: If you like Jekyll, you can use it to render publication lists on your homepage directly from BibSonomy. Checkout the Jekyll plugin and the accompanying explanation on how to use it. With the right CSS you get a publication list that looks nice and quite similar to that from DBLP.

Happy programming with Ruby!

Tuesday, September 9, 2014

Feature of the Week: BibSonomy and Memento

Over the past weeks, the Memento team has worked with colleagues at BibSonomy to enable Memento-related functionality for BibSonomy bookmarks. The Memento "Time Travel for the Web" protocol specified in RFC 7089 extends the HTTP protocol with datetime negotiation, a variant of content negotiation. A Memento client requests an old version of a resource by expressing the resource's original URI along with the datetime of the version it is interested in. A Memento server, such as a web archive, responds with an archived snapshot of the resource that is temporally closest to the datetime requested by the client. A Memento Aggregator simultaneously polls multiple web archives and returns the temporally closest snapshot available irrespective of the archive it resides in.

Two features that use Memento infrastructure were added for BibSonomy Bookmarks:
  • Bookmarked links are annotated with a data-versiondate attribute that conveys the datetime of bookmarking. This attribute, as well as the related data-versionurl, were first proposed in the Memento-related Missing Link document that explores annotating links with temporal information as a means to increase link robustness and to allow revisiting linked resources as they were seen by the creator of a link. Both attributes make use of an extensibility mechanism offered by HTML5 that allows the introduction of private data- attributes. The Memento extension for Chrome supports both attributes. For bookmarked links in BibSonomy, the extension presents a menu item Get at link date ..., which allows to look for archived snapshots of the bookmarked page from around the time it was bookmarked. This feature is demonstrated in the below image. At the left hand side, a user clicks the link to the website of the Raw visualization tool and receives the current version of the page in response. At the right hand side, a user right-clicks the same link in a Chrome browser that has the Memento extension installed. Since that link is annotated with the datetime of bookmarking - expressed as the attribute data-versiondate="2014-03-16T17:42:12+01:00" on the link - the Memento extension uses the provided date for web time travel and tries to find the archived snapshot of the Raw site closest to the date of bookmarking. It finds a snapshot dated March 7 2014 in the archive.today web archive that looks rather different than the current version.
  • The same functionality is available without the Memento extension for Chrome by clicking the little clock at the bottom of the bookmarked item. Doing so initiates a request by a Memento client at the end of BibSonomy that is targeted at the Memento Aggregator and that results in a redirect to a temporally appropriate Memento.

Both features are really neat and I would like to thank Robert Jäschke and his colleagues at BibSonomy for making this happen and Martin Klein at the Memento end for initiating the collaboration!


Herbert Van de Sompel, Los Alamos National Laboratory

Thursday, August 21, 2014

ThrowbackThursday

As we are about to release a new design for BibSonomy, we would like to show you a bit of the beginnings of our system. When it started out in 2006 the website looked a lot like today and still totally different:


The first publication on BibSonomy was also published in 2006 as was the very first blog post.

At the moment we are testing the new bootstrap layout, which will hopefully be released soon:


So stay tuned and keep tagging!

Lena

Wednesday, August 6, 2014

Feature of the Week: Developers Corner

As part of our process to open BibSonomy up for developers, we have re-designed the BibSonomy start page at Bitbucket:
The three blue boxes provide quick access to pages about developing for and with BibSonomy, integrating BibSonomy with other tools and services, and using BibSonomy for research. They help you to easily find the information you need. The three grey boxes at the bottom provide further information, e.g., news about BibSonomy, who's behind BibSonomy, and where to find help.
In addition, the API documentation has been greatly improved during the last weeks. All developers definitely should have a loon on it and on the other relevant wiki pages.

Have a look at the new page and as always ... happy tagging!


Thursday, July 24, 2014

Feature of the Week: Clipboard for beginners

This week we want to introduce some features offered by our clipboard that some of you might not know yet. The clipboard enables you to collect a subset of your own and other's publications. To add publications to the clipboard you can simply use BibSonomy's clipboard button as shown below: 


Once you've added all publications of interest to the clipboard you can export them using a format like MS Office XML, which was introduced last week. 


Another feature of the clipboard which is only available for your own publications is the adding of tags to multiple publications. You get there by clicking "edit own entries" in the above figure.


For example, if you want to collect publications as relevant literature for a paper, a class or a project, you can mark these publications in the clipboard by adding a meaningful tag to them.


Happy tagging!
Lena

Monday, July 14, 2014

Feature of the week: MS Office XML export

The new MS Office XML export enables you to easily import your publications into MS Word.

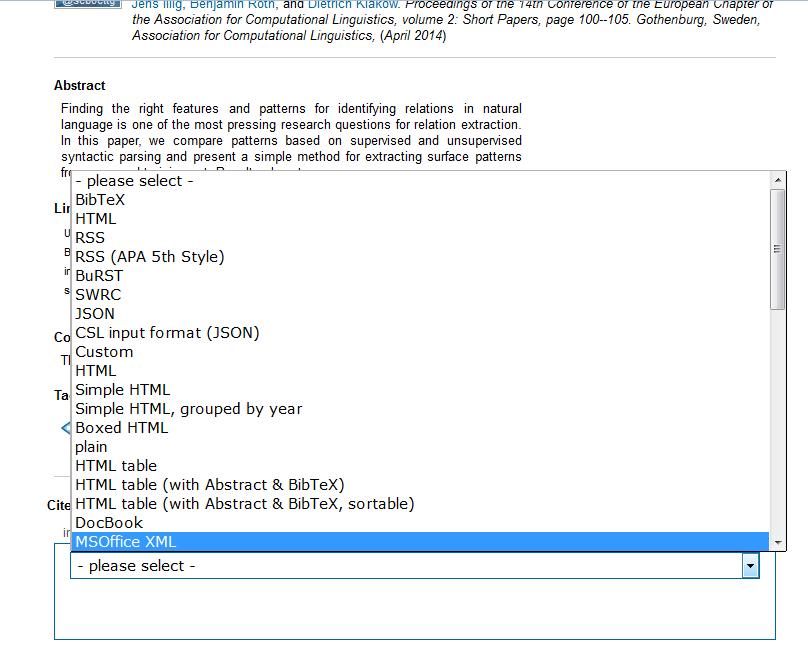
To export a publication, simply select the "MSOffice XML"-Option in the "all formats"-ComboBox and save the xml-file.


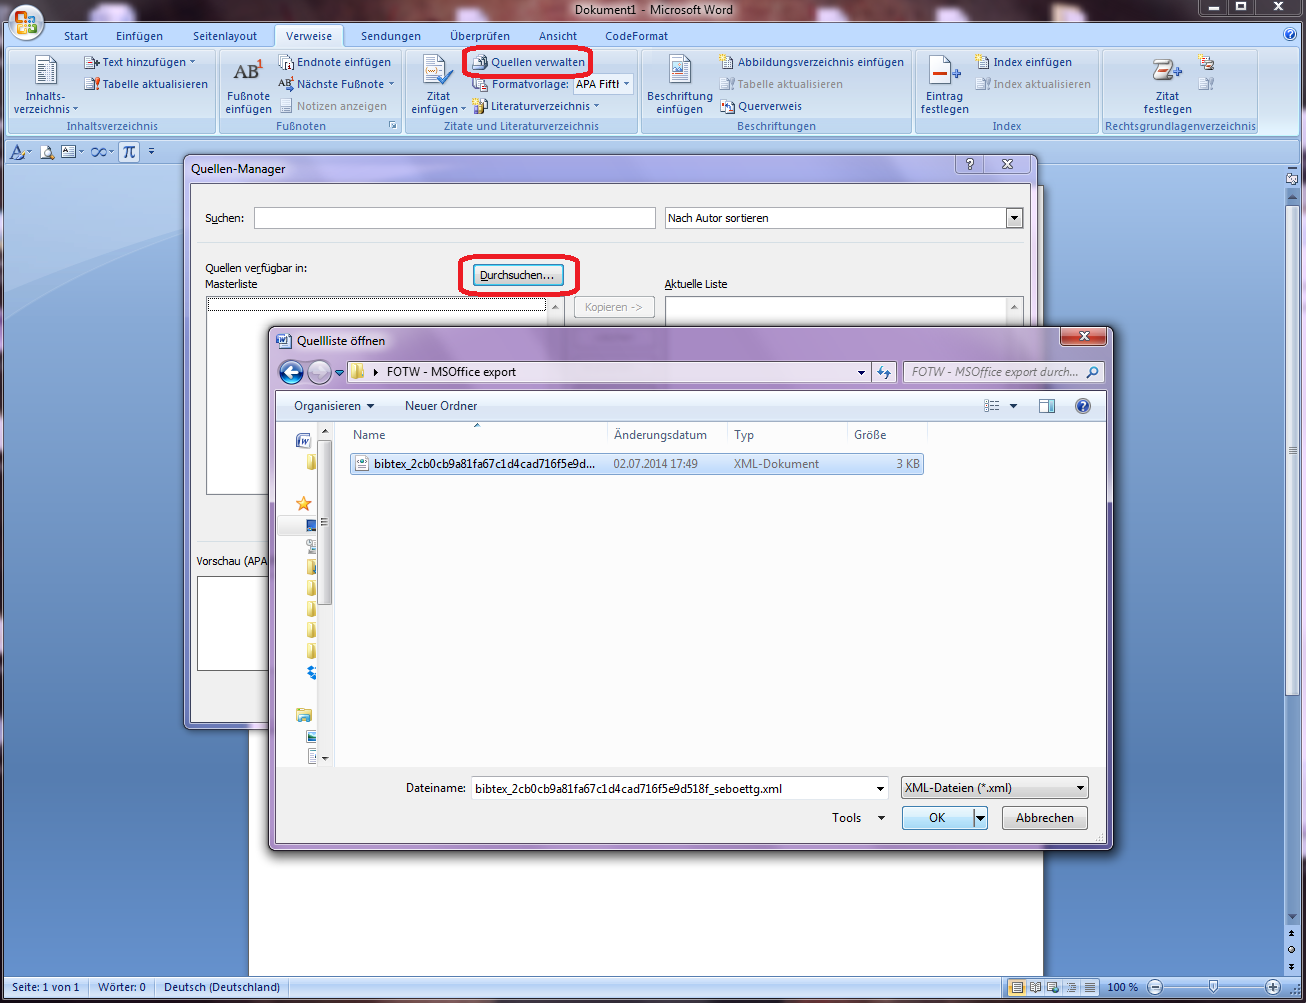
You can also export all your Publications via selecting the "MSOffice XML"-Option on the export page. To import your publications into MS Word open the Reference-Manager, select "Browse..." and open the export xml.


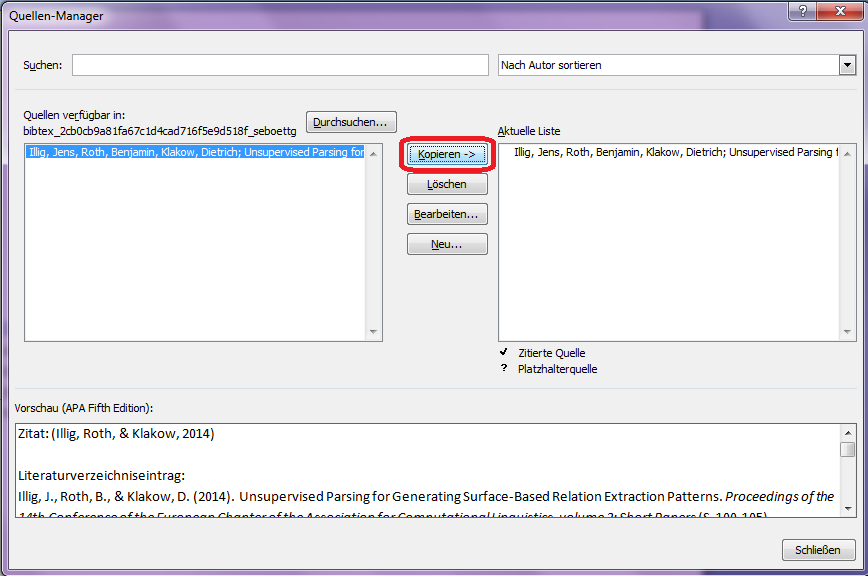
Now you can select the publications you wish to copy into your bibliography on the left side, hit "copy" to add them and finally close the window.

https://blogger.googleusercontent.com/img/b/R29vZ2xl/AVvXsEgihxH7PgFA-DddWJTlwCPqb8m4bscZWv-BlzlvRpIWuZbvh_NDSkkSzEihZM8hGe5YReL6V3MeuRrwm-dRKQo3JNH5jBLw-FdDPwVU3xJZOcrbxgU43bi17gOzS1hM16ApQWtj/s1600/Screen3.png

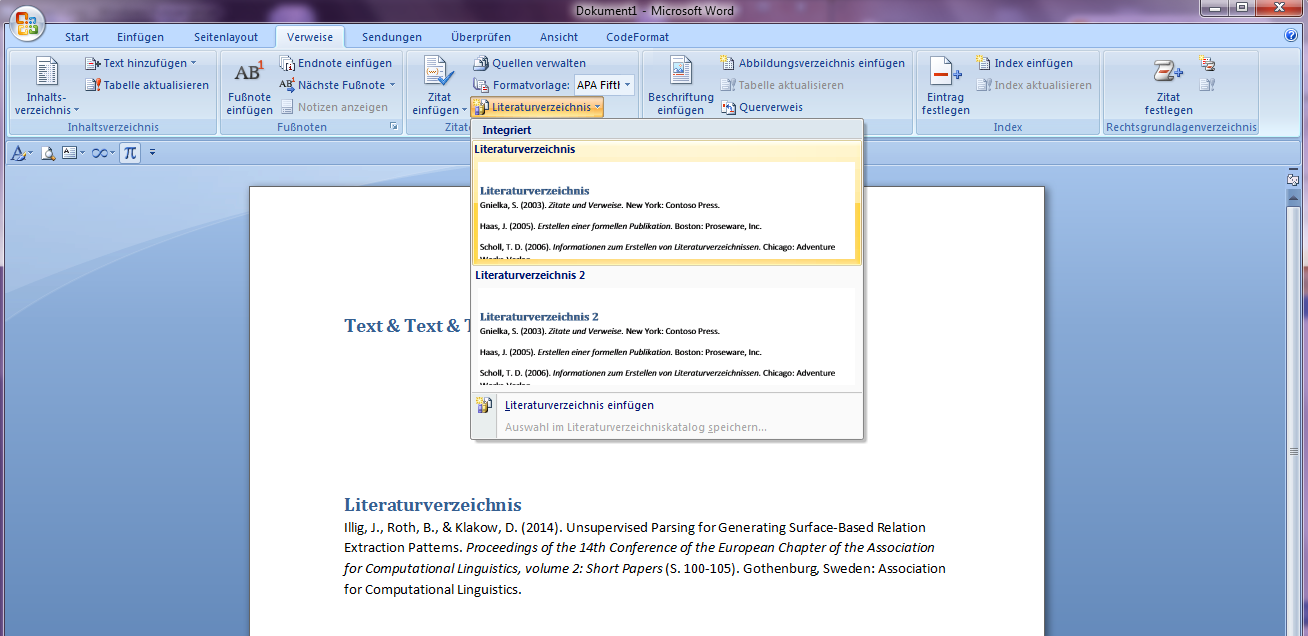
Et voilà!. A click on "bibliography" lets you add the bibliography to your document, including all your previously imported sources.

https://blogger.googleusercontent.com/img/b/R29vZ2xl/AVvXsEi1oGV6ABVKcGmqfRKO04kJF_ouihguveH-B-gH1cNkeeadPYTZQeA-spe8YVbHTyuZP_oOvTIpzDRJMcDhbyYg9ieIsK5-A_Y79J4-ik_Dn-Ps3gVI1WD4qrFWpXktTnLkcIDt/s1600/Screen4.png


Happy Tagging
Marcel

Monday, June 23, 2014

Feature of the week: Full title text when hovering over titles

When many publication and bookmark posts are displayed in a list, then there is a lot on the page - except space. This is why we need to abbreviate titles and other information such as the titles of journals or conference proceedings. A while ago, we had lots of hovers everywhere on the post-lists but we found that they were too obtrusive. Now, you can see the unabbreviated information as lightweight hovers when moving the mouse over one of the abbreviated titles. Seeing the non-abbreviated version is sometimes necessary to distinguish publications which appear in different versions for example in proceedings and in a journal or simply in an online archive.


Happy tagging!
Jens

Wednesday, June 11, 2014

Feature of the week: Save-and-rate button

A nice but not very often used feature of BibSonomy is the rating of bookmarks and publications. Rating and discussing posts may help you to remember your evaluation of a post and share it with others. It may also help to find the best publications concerning a certain topic or within a group

To simplify the rating process you can now click on our new save-and-rate button when adding or editing a posts: 


This will get you to the discussion page where you can rate and/or comment on your post. Your rating and comment will be publicly visible by default. You can change the visibility though and add for example an anonymous comment. If you want to add internal links to other publications on BibSonomy you can also add those references with the corresponding button.


Happy rating!
Lena

Thursday, June 5, 2014

Feature of the Week: Bookmarking publications from Morgan and Claypool Publishers with the BibSonomy add-on

This week's feature is presented by our student Haile: 

The new MorgenClaypoolScraper scrapes publication metadata from Morgan & Claypool Publishers and thereby allows you to easily store that data in BibSonomy. Using the scraper is very easy with the BibSonomy add-on. If you do not have it in your browser, yet, download and install it for your browser. Here are the basic steps to follow when you want to post publications using the add-on: 
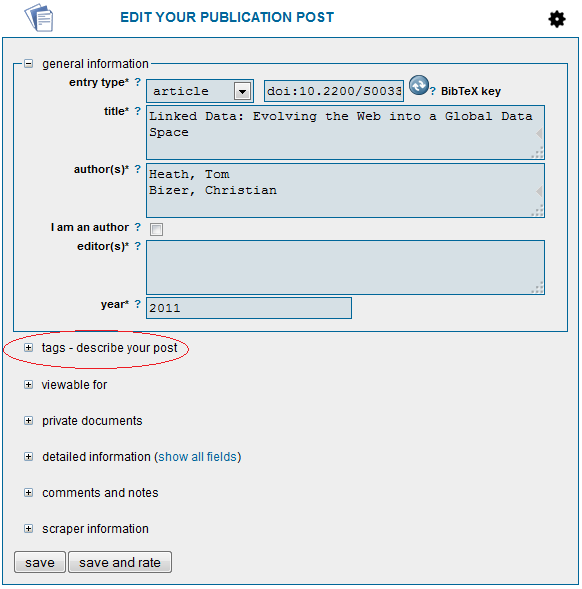
  1. Open a publication from Morgan & Claypool publishers. For example, Linked Data: Evolving the Web into a Global Data Space is available on their website.  
  2. Click on the save publication button on your browser:  
  3. A new page will be loaded for editing your entry. Add tags by extending tags (encircled in red). Possible tags will be recommended by BibSonomy.  
  4. Click on the save button.

As you can see, it’s very easy: on the publication site from Morgan & Claypool you just need to click on the post publication button of the BibSonomy browser add-on.


Happy Tagging!


Haile M

Monday, May 26, 2014

Feature of the week: Updating Privacy in batchedit page

We have added a new option to the batchedit page** : Set Viewability.
You can select ‘Set Viewabilty’ from the drop down list and this allows you to set the same privacy to several posts at once.


This new feature might be useful after joining a new group. In this case the user can set the privacy of several posts to the new group at once. Also it will be a nice feature for users who do not want to let others know, before they publish their work. In this case they can set previously private posts to public after privacy is no longer necessary.
In addition to the above use cases, it can be applied to posts in PUMA, where posts are stored as private by default. It is troublesome to put them individually to public. This feature saves a lot of time and clicking in such a case!

** Batchedit page can be reached by firstly clicking on the small cog-wheel symbol above a post-list ( On the own BibSonomy page) and then selecting the ‘edit own entries …’.


Happy tagging
Nasim

Tuesday, May 13, 2014

TYPO3 extension BibSonomy CSL supports export for Endnote

The new release of the TYPO3 extension BibSonomy CSL supports exports of publication in the Endnote citation style. In the setup of the front-end plugin you can now enable (next to links to the abstract, to BibTeX, or following a publications URL) also a link to the Endnote export.


Upon request, the exported data will be fetched directly from BibSonomy/PUMA using AJAX. The screenshot shows how a publication might look like on your homepage, with Endnote export enabled and requested:


Happy tagging
Sebastian

Wednesday, May 7, 2014

Feature of the week: Sortable post list (via API)

If you want to process BibSonomy data our API is the place to look for it. Various informations can be received through it. One example are post lists belonging to user x. These post lists can now be sorted by using the keys 
 sortPage=(author|title|year|...)
&sortOrder=(asc|desc)

An example for retrieving bookmarks sorted by title can be seen below: 


Additional information on how to use our API can be found on our help pages.

Sorting post lists via the API works the same way as sorting posts on BibSonomy:


Happy Tagging!
Lena

Wednesday, April 30, 2014

Feature of the week: System Tags

In BibSonomy there exist a few special tags, so called system tags, which expand its functionality. Today I'd like to give a short overview. Information on (system) tags can also be found on our help pages.

System tags can be grouped into two categories:

Tags that can be added to a post 
  • for:<groupname> copies a post to a group's collection with the tag replaced by from:YourUserName. The copied post will remain unaltered if you change or delete your own post. You must be a member of the group you forward the post to.
  • myown: adds the post to your CV page.
  • send:<username> sends a post to the inbox of another BibSonomy user. To use this tag, the receiver must have added you to his BibSonomy friends list or you and the receiver must have at least one group in common.
  • sys:hidden:<tag> hides a tag from every user besides yourself. 
  • sys:relevantFor:<groupname> adds a post to the relevantFor-page of the a group. This tag has the same effect as selecting a group in the "relevant for"-box while editing the post.

Tags that can be used as a filter for search queries 
  • sys:author:<authorname> filters the search range by author.
  • sys:bibtexkey:<bibtexkey> filters the search range by bibtexkey.
  • sys:entrytype:<entrytype> filters the search range by entry type.
  • sys:group:<group> filters the search range by group.
  • sys:not:<tag> excludes entries with tag <tag>. Here you can also use wildcards, e.g. sys:not:news_* excludes all posts with tags that start with "news_". See our earlier blog post for more information.
  • sys:title:<title> filters the search range by title.
  • sys:user:<user> filters the search range by user.
  • sys:year:<year> filters the search by year of the publication. Several arguments are possible, e.g.:
    • 2000: all posts of the year 2000
    • 2000-: all posts from the year 2000 or from one of the following years
    • -2000: all posts from the year 2000 or from an earlier year
    • 1990-2000: all posts from the years 1990 to 2000

I hope this overview will help to improve your experience with BibSonomy. 

Happy Tagging!
Lena

Friday, April 25, 2014

Feature of the week: creating concepts via the REST API

As a careful reader of our blog, you will have notived that tag relations, or concepts are a feature of BibSonomy which is important to us but probably not often used. Some previous blog posts where we promoted concepts are
We recently started to better support concepts with BibSonomy's REST API by implementing the creation of new concepts in the Java REST client. In this post I give you an example how you can access this functionality. Since we start from scratch, this post is also a good introduction on how to use the Java REST client in general.

Setting up Maven

Using Maven for build management really simplifies many things, so let's use it. First, create a directory for the project and change to that directory. Everything you do, will now happen there. Then inside that directory, create a directory for the source code:

mkdir -p src/main/java

and then create a file called pom.xml with the following content:

<?xml version="1.0" encoding="UTF-8"?>
<project xmlns="http://maven.apache.org/POM/4.0.0"                                                                                                        
         xmlns:xsi="http://www.w3.org/2001/XMLSchema-instance"                                                                                               
         xsi:schemaLocation="http://maven.apache.org/POM/4.0.0 http://maven.apache.org/maven-v4_0_0.xsd">
  <modelVersion>4.0.0</modelVersion>
  <name>Test</name>
  <groupId>com.example</groupId>
  <artifactId>test</artifactId>
  <version>0.0.1</version>
  <repositories>
    <repository>
      <id>dev.bibsonomy.org</id>
      <url>http://dev.bibsonomy.org/maven2/</url>
    </repository>
  </repositories>
  <dependencies>
    <dependency>
      <groupId>org.bibsonomy</groupId>
      <artifactId>bibsonomy-rest-client</artifactId>
      <version>2.0.43</version>
    </dependency>
    <dependency>
      <groupId>org.bibsonomy</groupId>
      <artifactId>bibsonomy-model</artifactId>
        <version>2.0.43</version>
    </dependency>
  </dependencies>
</project>
You can now already test, if everything is OK by calling mvn install which should print you some lines with one of the last being

[INFO] BUILD SUCCESS

Writing and calling Java code

Now you can start to write the first Java code. Create the file src/main/java/Test.java with the following content:

class Test {

    public static void main(String args[]) {
       System.out.println("Hello World!");
    }
}

You can compile this file into a JAR by calling mvn install again. The resulting JAR file test-0.0.1.jar will be in the target folder. You can run this class with the command

java -cp target/test-0.0.1.jar Test

or alternatively with
mvn exec:java -Dexec.mainClass="Test"

The latter is the preferred choice for the next steps, since you will include some libraries whose dependencies Maven automatically resolves.

Calling the REST API

Change the file Test.java to the following code:

import java.util.*;                                                                                                                                          
import org.bibsonomy.common.enums.*;
import org.bibsonomy.model.*;                                                                                                                                
import org.bibsonomy.model.logic.*;
import org.bibsonomy.model.enums.*;                                                                                                                          
import org.bibsonomy.rest.client.*;

class Test {

    public static void main(String args[]) {
        RestLogicFactory rlf = new RestLogicFactory("http://www.bibsonomy.org/api");

        LogicInterface logic = rlf.getLogicAccess("jaeschke", "YOUR-API-KEY-HERE");

        List<Post<BibTex>> posts = logic.getPosts(BibTex.class, GroupingEntity.USER, "jaeschke", null, null, null, null, Order.ADDED, null, null, 0, 1);

        for (Post<BibTex> post: posts) {
        BibTex publication = post.getResource();
            System.out.println(publication.getTitle());
        }
    }
}
 
Note that you have to change the line

LogicInterface logic = rlf.getLogicAccess("jaeschke", "YOUR-API-KEY-HERE");

to use your BibSonomy user name instead of "jaeschke". You also must insert your API key which you can get from BibSonomy's settings page. When you compile (mvn install) and then run (mvn exec:java -Dexec.mainClass="Test") this class, it should print the title of my last publication post. You now change that code again, to finally create a concept.

Creating a concept with the REST API

import java.util.*;
import org.bibsonomy.common.enums.*;
import org.bibsonomy.model.*;
import org.bibsonomy.model.logic.*;
import org.bibsonomy.model.enums.*;
import org.bibsonomy.model.util.*;
import org.bibsonomy.rest.client.*;

class Test {

    public static void main(String args[]) {
        LogicInterface logic = new RestLogicFactory().getLogicAccess("jaeschke", "YOUR-API-KEY-HERE");

        Tag concept = new Tag("science");
        concept.addSubTag(new Tag("physics"));
        concept.addSubTag(new Tag("chemistry"));
        concept.addSubTag(new Tag("biology"));

        logic.createConcept(concept, GroupingEntity.USER, "jaeschke");
    }
}

Again, you have to change your credentials in the call to getLogicAccess().

What does the code do? First, it creates an object for the concept "science"

Tag concept = new Tag("science");

and then adds the subconcepts "physics", "chemistry", and "biology":

concept.addSubTag(new Tag("physics"));
concept.addSubTag(new Tag("chemistry"));
concept.addSubTag(new Tag("biology"));
Finally, the concept is stored on the server:

logic.createConcept(concept, GroupingEntity.USER, "jaeschke");

Note that you have to exchange "jaeschke" here by your user name, since one can only create concepts for one's own account. You can then find the concept in your sidebar:


That's it! :-)


Happy programming & tagging!

Popular Posts